- TIPS & TRICKS/
- How to Eliminate Empty Rows in Excel/


How to Eliminate Empty Rows in Excel
- TIPS & TRICKS/
- How to Eliminate Empty Rows in Excel/
How to Eliminate Empty Rows in Excel
If you’re working with datasets in Excel, you’ve certainly come across empty rows from time to time. These empty rows can show up for a number of different reasons, including user input errors, issues when merging data from different sources, or accidental deletion or movement of data.
While these empty rows may be easy to spot and remove manually on a smaller dataset, in large databases with thousands of rows, it becomes less easy to find and deal with them manually.
With that in mind, this guide is going to go over the different methods to eliminate empty rows in Excel, why it’s important, and how to deal with the common issues you may run into.
Explore our list of Excel courses for tips and advice on other topics!
Why Eliminating Empty Rows in Excel Matters
Getting rid of empty rows in Excel is important for a number of different reasons. First, blank rows within your dataset can lead to inaccurate data analysis and calculations, giving you an incorrect or skewed view of your data. These can often lead to misinterpretations when trying to understand the data, as well.
Blank rows can also disrupt the filtering and sorting process in Excel, lead to formula-related errors, increase file size, reduce performance, and may make the dataset harder to read and make sense of.
Ways to Remove Empty Rows in Excel
If you want to remove empty rows in Excel, there are a few different methods you can use. The one you choose depends on whether you want to remove all rows with any blanks in them, or only the entirely blank rows.
To remove any rows that have a blank cell in them, you’ll use the Go to Special feature, and to remove only entirely blank rows, you’ll use the COUNTA function and a filter.
Method #1: Go to Special
1. After opening your dataset, navigate to the Editing section of the Home tab, and click Find & Select.
2. In the dropdown menu, click Go To Special.
3. Select Blanks from the available options, and click Ok. Excel then selects all the blank cells.
4. Back on the Home tab, go to the Cells section and click Delete.
5. From the options, click Delete Sheet Rows.
6. You’ll be left with only complete rows, as any rows with a blank (or multiple blanks) in them are deleted.
Method #2: COUNTA Function and Filter
1. Begin with your dataset.
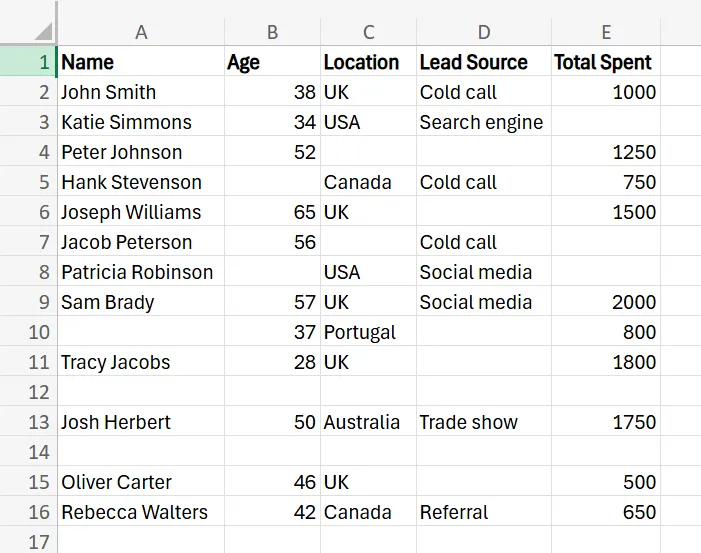
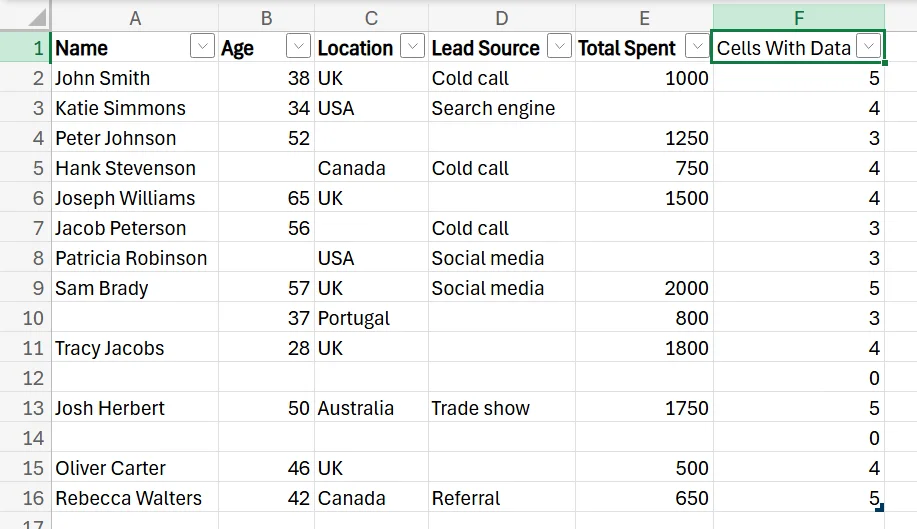
2. Add a new column into the dataset, called something like “Cells With Data” or “Blanks”, and add the COUNTA function to the first cell with the syntax =COUNTA(cell range). This automatically counts the number of cells in a range that aren’t empty.
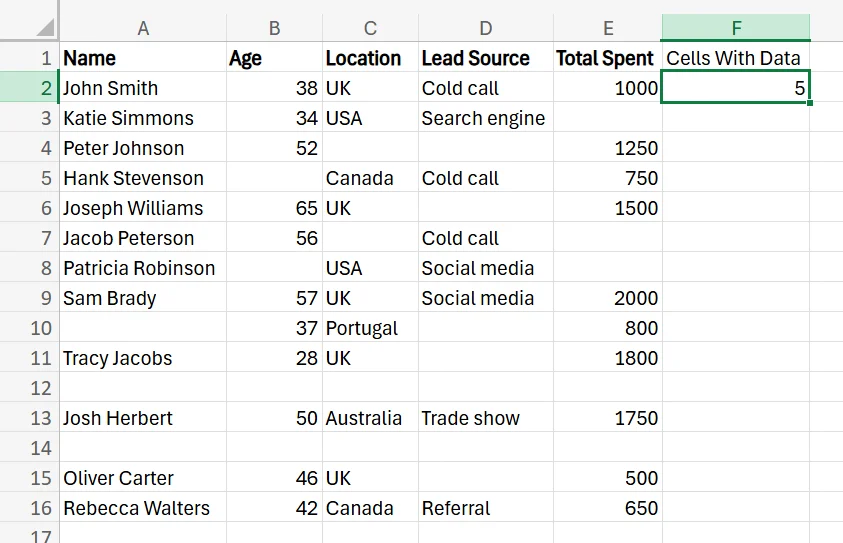
3. Click on the lower right corner of the cell with the COUNTA function in it, and drag it down over the rest of the rows.
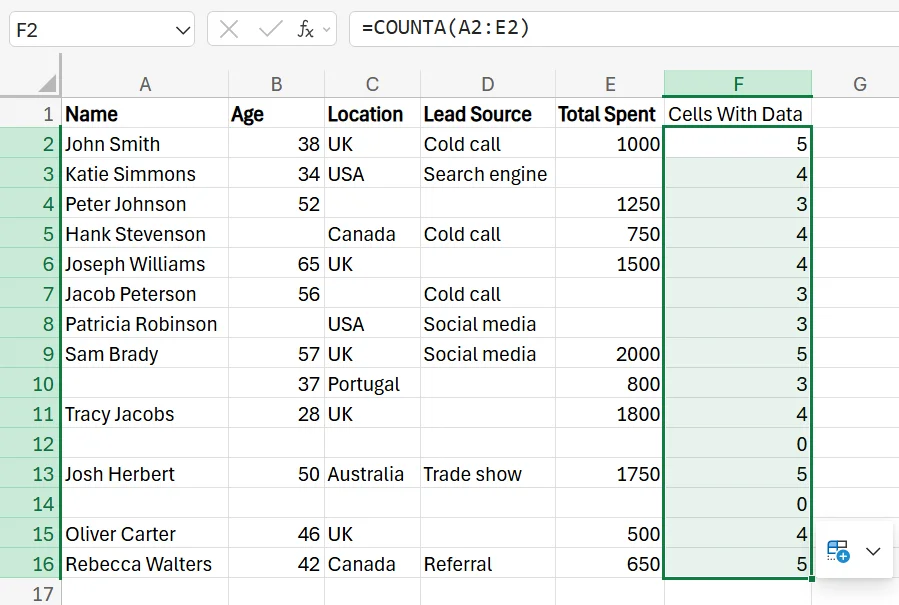
4. All of the entirely blank cells will return a result of 0.
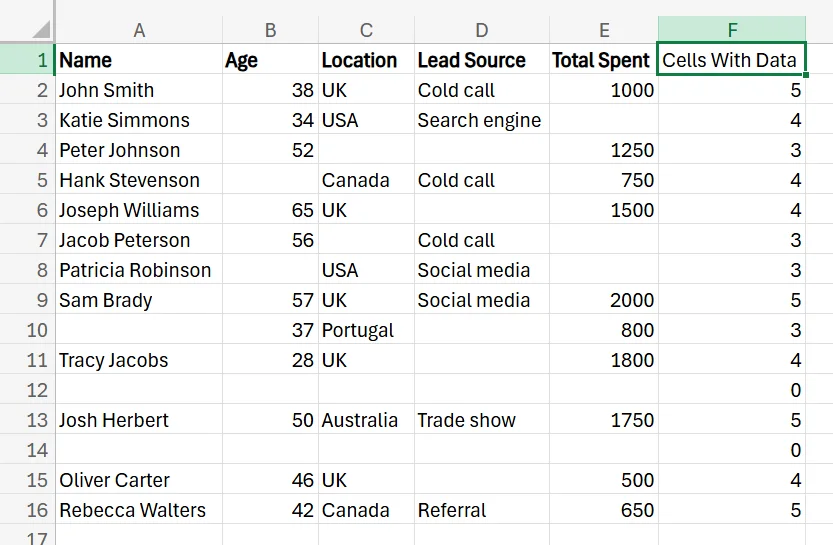
5. To filter these cells, select the cell where you put the title for the new column, which in this case is cell F1.
6. Next, go to the Data tab, and in the Sort & Filter section, click on Filter.
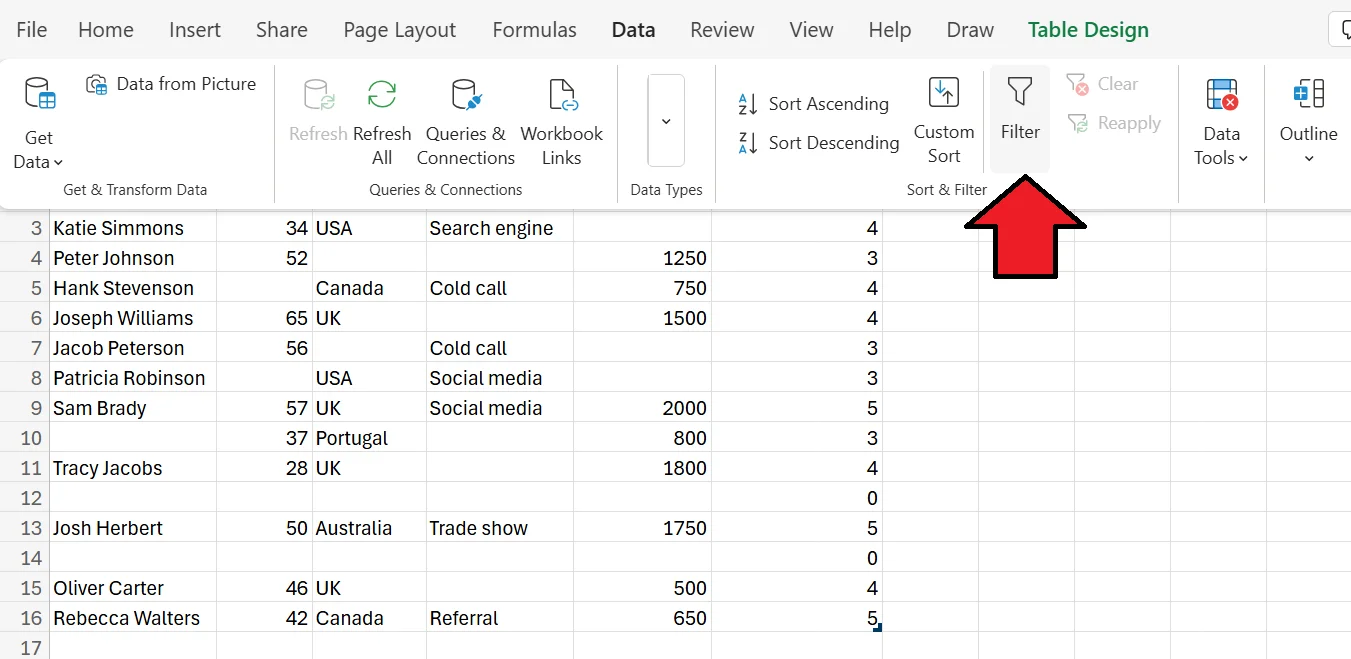
7. After clicking Filter, arrows will appear in the column headers.
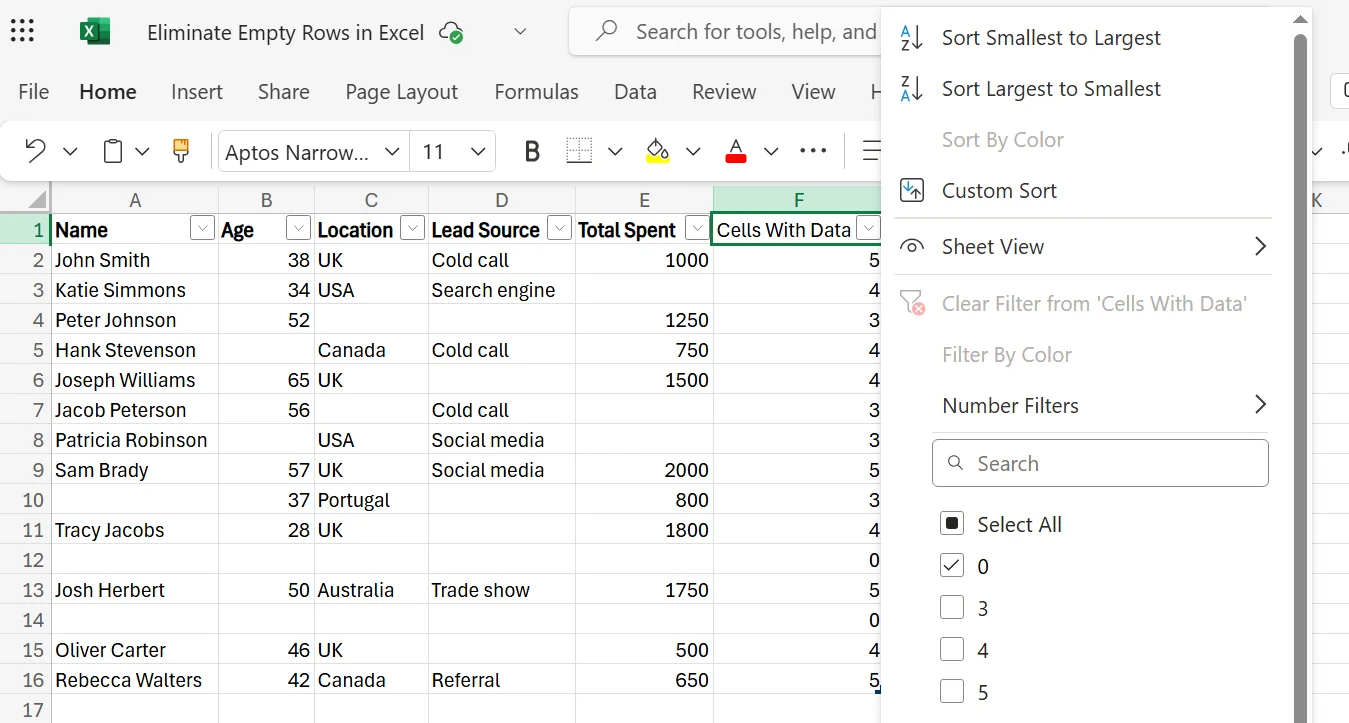
8. Click the arrow next to the new column you made, make sure the only box checked is the one next to the 0, and scroll down to click Apply.
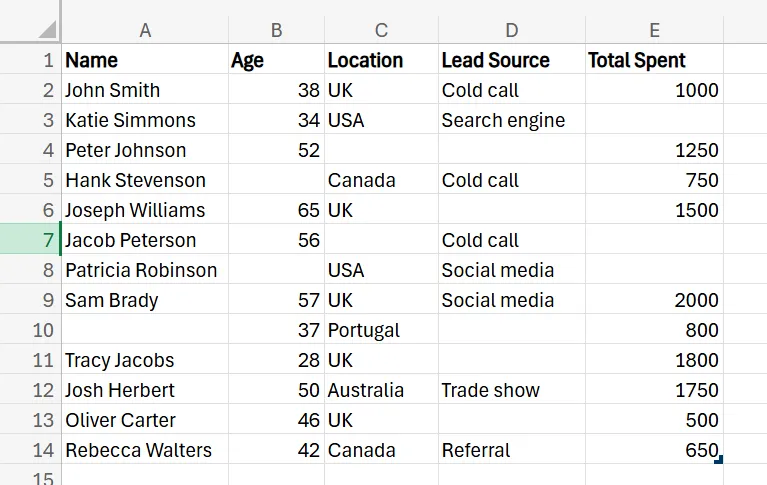
9. Now, Excel only displays the completely empty rows, which in this example dataset are rows 12 and 14. Simply delete these rows, click the Filter button again to remove the filter, and delete the new column you just created.
10. Once you do that, you’ll be left with your original dataset, except that all of the entirely empty rows have been removed.
Download our Excel Formulas Cheat Sheet
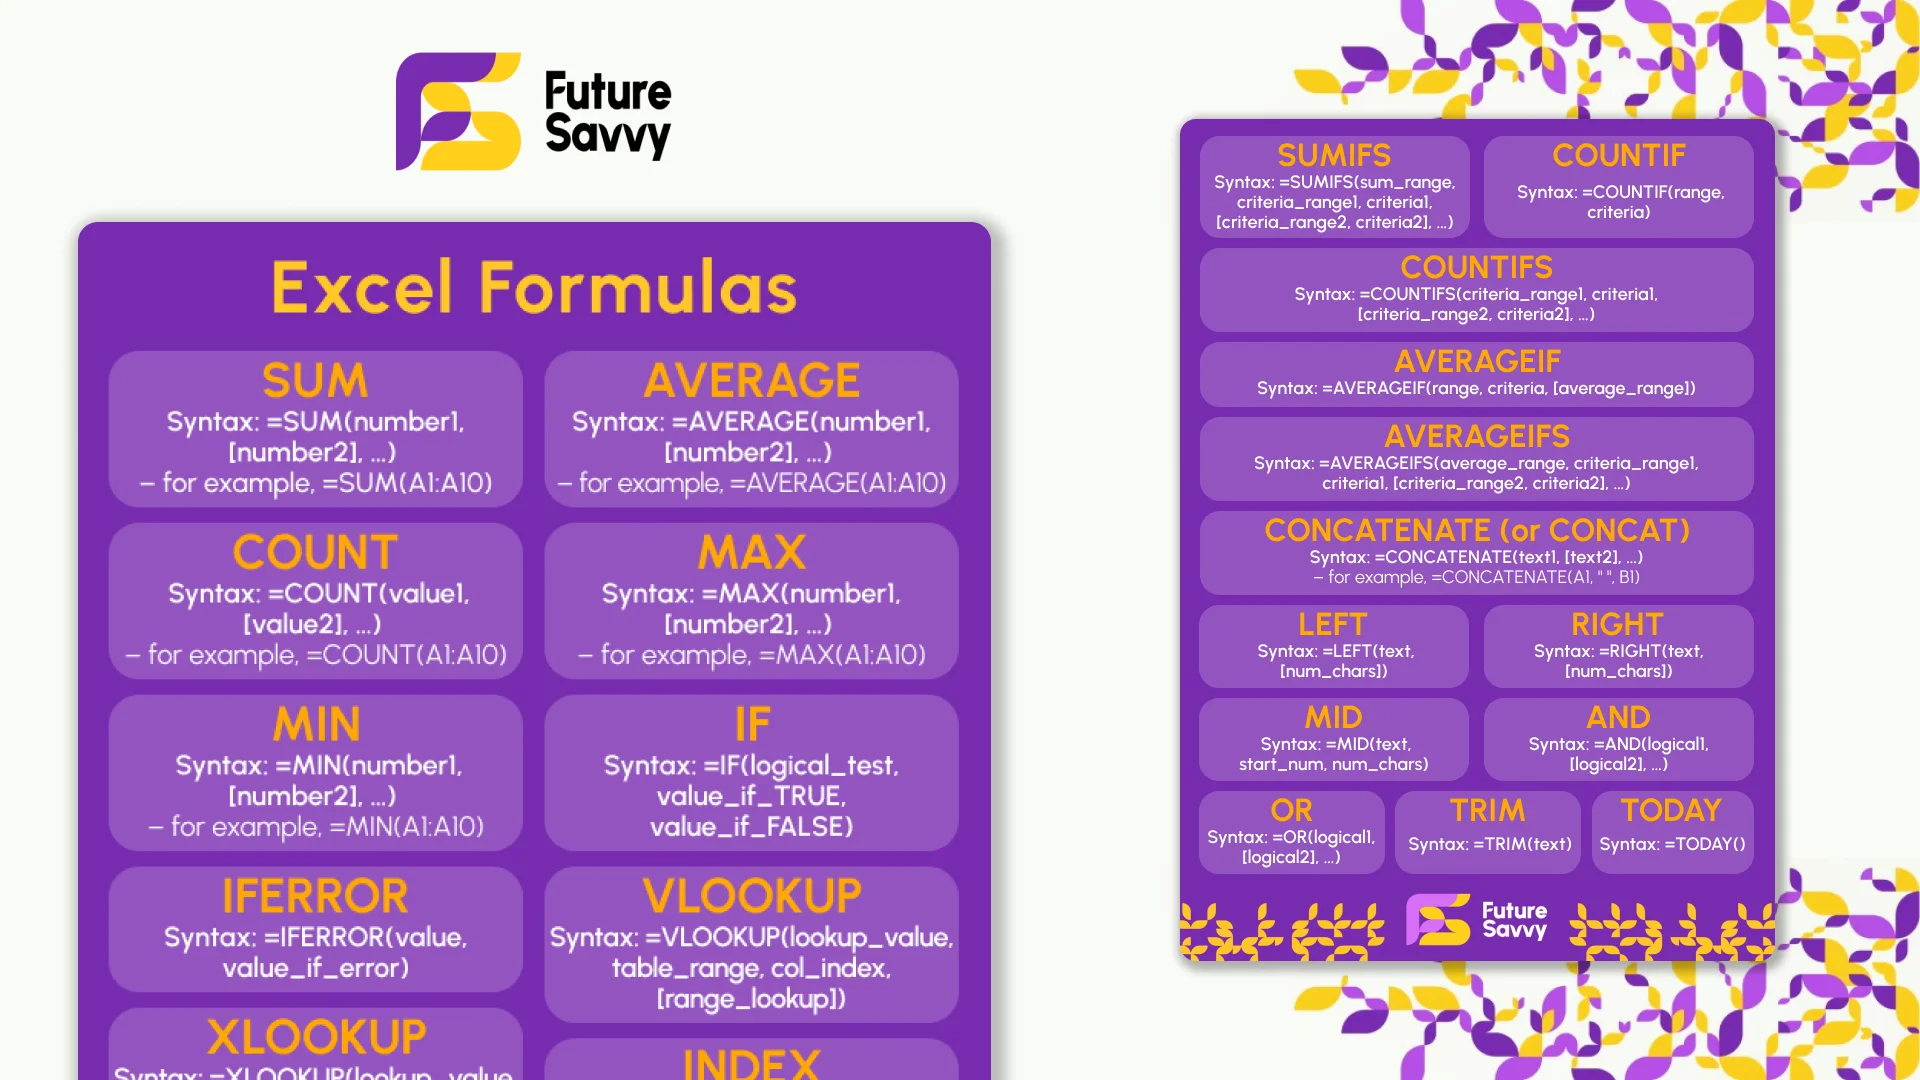 Download now
Troubleshooting Common Issues When Eliminating Blank Rows
Here are a few common issues you may run into when removing empty rows in Excel.
Incorrectly Deleting Rows
Of course, there are times when you may incorrectly delete rows when trying to eliminate only the blank ones. You may misclick, choose the wrong box when filtering rows, or even eliminate rows that aren’t actually empty but just have hidden data.
To deal with this issue, always check to ensure you’re deleting, selecting, and/or filtering only the rows you intend to, and you’re not removing any important data by mistake.
Slow Performance or Freezing
Filtering and deleting rows in a large database is a very resource-intensive and heavy process. As a result, it can be taxing on Excel and even your computer itself. If you find it takes forever to delete these rows, or your Excel freezes, it can be an annoying experience.
If your dataset freezes or lags every time you try these methods, consider splitting up your data into two or three smaller datasets instead of one large dataset. Also, if you have Excel add-ins, or other resource-intensive things occurring on your computer, consider stopping those for the time being to help prevent these slowdowns and freezes.
Formula Errors
In some cases, when you delete rows (empty or not), you may disrupt or break existing cell references within your formulas, leading to errors or improper calculations. It may also not be immediately obvious that this is the cause of the errors or other issues, which can lead to a lot of wasted time looking for the culprit.
Thankfully, the fix for this is simple, as all you need to do is check and verify your formulas before and after deleting the rows to ensure nothing is broken and no problems have occurred.
To discover more detailed use cases and advanced business techniques, don’t hesitate to contact us!
Related Articles
 Tips & Tricks
How to Calculate Age in Excel
Learn how to calculate age from a date of birth in Excel using the DATEDIF function, plus alternatives like YEARFRAC and INT for greater precision. This step-by-step guide covers cell formatting, formula entry, and quick copying, and explains why age calculations matter for HR planning, customer insights, and resource allocation.
 Tips & Tricks
How to Compare Two Columns in Excel
This article explains how to easily compare two columns in Excel, especially when working with large datasets. It outlines common methods such as using formulas like IF, EXACT, and VLOOKUP, as well as conditional formatting to highlight differences or similarities. The guide also covers why column comparison is useful for identifying duplicates, missing values, and patterns in data. Finally, it offers best practices like ensuring data compatibility, verifying formulas, and labelling columns clearly for accuracy.
 Tips & Tricks
The 5 Best Online Excel Training Courses
This article highlights the importance of Microsoft Excel in modern business and the gap between daily use and formal training. It introduces the 5 best online Excel training courses—Coursera, Udemy, LinkedIn Learning, Microsoft Office Courses, and Future Savvy—each catering to different needs, budgets, and learning styles. The guide emphasises building foundational skills, mastering formulas, and using structured learning for long-term growth.